 |
| Inexpensive canvas tote bag |
 |
| Folding Gelli Plate Book |


It's important to note that the only real painting I did today was the canvas bag. The other things I just put together in a little "kit" to demonstrate to folks who are (I hope) going to sign up for my Gelli plate workshop in August an idea of some of the things that "emerge" and what are some things to do with the lovely papers.
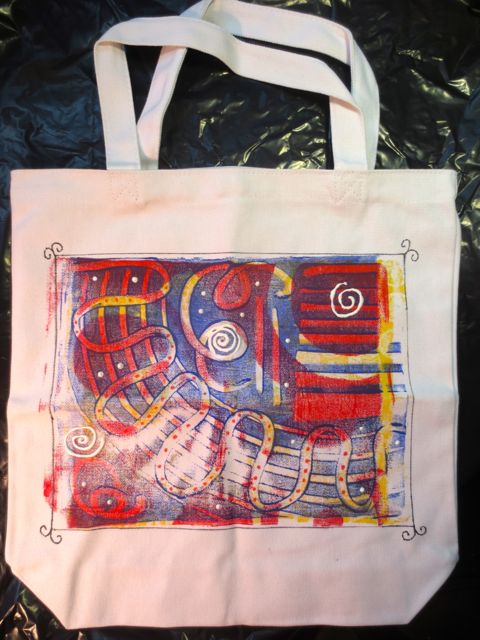
The canvas bag is my first time to print on fabric and I just used regular acrylic paint as I did not have any fabric paint. I think for a heavy canvas bag that regular paint is okay but I learned a lot in this first experiment. One I learned you need a lot more paint on your Gelli plate that you would with paper! Way more! And you need to press much harder especially if you have to press through two pieces of fabric as I did!
I did add some embellishments with slick 3D paint and with fabric markers.
I did do both sides. The other side is "okay" but nothing to write home about. I may still be able to make it more interesting later. If it does "get better" I will post it. The other side was the first side I did. Thus it is hidden. Hahaha.
The folding book idea came from another Gelli arts teacher and it is simply taking small 3.5 x 5 bits cut from your deli or other papers and glueing them with a glue stick. You could do some embellishments with pens and stamps later. It would be nice if everyone could take one home at the end of the workshop. I did glue paper on both sides but if you didn't you would have the option of cutting the book apart to make greeting cards too. All of these papers were from another day of printing.
The matted gelli prints were an idea I came up with this afternoon. I picked up 4 nice little mats free from a friend who is moving and giving away her art cache.
As I was selecting papers for the folding book I saw the bag of mats and thought…hmmmm. Why not show off some of my interesting prints in a new way.
What do you think?
The blue swirly one is slightly "enhanced" with some shading and some white charcoal pencil for the reflections and there is a little Zentangle added on the edges. The top one is made with my favorite (at this time) stencil. I love how the colors underneath show up in the circles. Fun!!!
The third one down, Cynthia will recognize as a hot glue gun mask! I need to make some more of those.
They are so organic and fun.
All of these are reasonably small and easy to pack up and so I am doing a short presentation to the art group on June 10 (next week) in order to get some interest going. The class will cost members only $15 which is a huge steal (I get paid a flat fee from the league). BUT everyone has to buy their own Gelli plate, brayer and paint. Still…most classes are quite a bit more and you always have to bring your own stuff!
I laughed…in my first demo yesterday I showed my 3 x 5 Gelli plate just as a sample of what they look like and one gal (quite mystified of course) raised her hand and said "can you reuse the Gelli plate?" I was dumb founded.
No comments:
Post a Comment