Monday, September 30, 2019

Closing Up the Art Show


Took down my paintings at the Woodruff, WI show today.  I had 4 there.  Nothing sold this time.  But that's okay.  It was a fun show anyway.  This scene of the sea turtles was a painting that Kendra hung over her bed for years.  When she passed away, it was bequeathed back to me.  It was fun to see it after so many years.  But I think of her every time I look at it.  

It's been pouring rain here in Lac du Flambeau for 12 hours straight.  Hmmm.
Greg maintains it is supposed to clear off this afternoon but then...you guessed it, more rain.  I think the rain symbol is there for the next 3 days now.  Sigh.  We are glad much of the yard work and shore work is done for closing.  12 days and counting.  

Inktober starts tomorrow.  I am tangling it.  But I'll only post every 3 days in October for that as I am tangling 3 on each 5 x 5" page.

Am off to make some white chicken chili for the church chili supper tomorrow night.  


Saturday, September 28, 2019

Alcohol Ink Play


This is alcohol inks (just playing in the studio) and getting ready for the workshop that will be on Wednesday. I haven't touched them for quite awhile.  

Some artists (on youtube) use canned air to help move the ink around.  Some blow with a straw.  I find that I get kind of dizzy if I blow a lot on the straw (others complain about this too) so I think I'm going to invest in canned air somewhere down the line.  

You get really interesting effect with moving the ink on glossy or non porous surfaces.  The ink doesn't work on paper.
You can use it on Yupo (plastic paper) or porcelain tiles or glass or plexiglass.   
So then I took this piece and enhanced it below:


There is something about the abstract quality of alcohol in that draws me toward putting Zentangle® on it.  These are Sakura MicroPerm archival ink pens.  I may put on more but decided to stop and look at it awhile.  I mean you can just go on forever and that might not be the best strategy.  The piece is on regular Yupo and is about 10 x 10".  It's very colorful and playful.  


For these little pice about 5 x 5, I used "translucent" Yupo Paper.
Kind of different effect.  I cut out a heart stencil out of Contact paper and adhered it to the Yupo paper to hold the ink in the shape.  (It still leaked a little under the edges.  You really have to press it down hard.)
It will make a pretty Valentine.  Also it can be hung on a window like stained glass.  You can also cut apart these abstract designs and make interesting collage pieces out of them!  
The paint is not stable so you have to seal it with a clear acrylic spray.  

Friday, September 27, 2019

The Milkweed Goes to Seed


Yesterday's walk was sunny, windy and nippy.  I should have worn gloves.  Where did I put them?  

I have been following the milkweed since spring...with the little caterpillars eating them like crazy and then off into that magic change into Monarch butterflies in August.  Now the plants are spreading their seeds again.  Beautiful puffs floating about.  

The pines drop about 1/3 of their needles each fall and they make a bright yellow carpet on some places on the road.

We are having a stretch now of VERY dark and wet and cool days (again).  Indian summer is over.  Highs about 56 today.  So I've started the humidifier in the house again.  Same every year about this time...heat and fireplace dries out the air.  

The countdown continues as always.  
Heading off to teach a little Zentangle® this morning, then a few errands in town. Hope everyone has a good weekend.


Thursday, September 26, 2019

Finishing Up the Drawing Class


Giving portrait drawing a little try.
The first one--not so good.
The second--a little better.


A proportional divider is a device to help artists get proportions correctly.  I am also trying out a new eraser called Vanish.  


This is a very small 4 x 5" pencil sketch.  

Sunday, September 22, 2019

Sketching and Drawing as Autumn Comes


You may have thought I'd abandoned my "littles".  Not so.  But I have been busy with my drawing class and other things so I did not post as often as I often this time around.  but I did complete one last night during a rain storm here at the cabin.  As you can see this one went from mid July to mid September!  But it still marks the time nicely for me with memories.  I love looking at Dean's dog, Molly, who came for a visit and being reminded of the wild flowers (like Tansies and Butter and Eggs) of late summer and early fall.  And that wild orange sunset was REALLY that color.  It was just amazing.  

I see the baby loon in the top right corner. The little loon is looking adult size now.  The parents have been teaching it all summer.  I think it is a "slow-learner".  It seems everyone on the lake has been rooting for the little fella.  I watched one afternoon while mother tried to teach it to dive and feed itself.  (It much preferred being fed!)  Now they are working teaching it to fly!  It's not going well.  They have to hurry up with this.  October is just around the corner.  (Loons are swimming birds and the flying thing is hard.  They are heavy in the water and it takes them forever to get up out of the water.) Sometimes in late September they take a practice fly because they haven't been flying all summer.  


This tiny little graphite sketch was my first attempt at using powdered graphite.  This is applied to the paper before you start drawing and then darkened or lifted out as you go along.  The birch and the road are lifted out.  It's only 3 x 5" but I learned a lot as I went along.  SO many things to learn about drawing!  I have one more class on Tuesday.  

Monday, September 16, 2019

One Last Homework exercise before Class 2 on Tuesday


The last homework lesson I quickly squeezed in this afternoon was labeled "free hand and control hand".  

What the author is getting at here is simply that he recommends that you take a pencil (or drawing tool) and with it held it at a distance from the drawing end...causing you to more freely or loosely sketch the large outer shapes of whatever you want to draw.
He suggests a bowl of flowers.  

(I just happened to have one on the table.). You can see the author's two examples above.  It also somewhat requires you to stay back a bit from the drawing surface...standing up or at an easel makes this easier.  Instead I propped my paper up on a drawing board against the table edge. 


I used an HB and 2B here to try to loosely pencil in the larger shapes.
I am finding using graphite to do what I normally do in ink and watercolor to be somewhat frustrating.  But trying new things is what this class is about.  


This is the same drawing...right on top of the first one.  The idea is then to re-define the shapes using a more controlled position on the drawing tool...closer to the paper.  

First off, I found that this subject matter is very complex.  If I was completely new to drawing I would be very intimated by trying to draw flower petals during the 2nd chapter!  I found making values with graphite to continue to be so challenging.  I think I'll get better with practice but I am constantly having to clean up...you have to put a paper under your hand/arm while working on graphite or it smears all over the place.  I have only my kneadable eraser and I think I need a few different erasers.  With graphite you draw by erasing it as well as laying on graphite

And again...trying to get the contrasting values is so difficult.  (where is my paint? 😳). I find I am moving from HB right up to 8B  (softer) by the time I am this far.  And the above is not really a finished piece..just an exercise.  I love lots of darks in a drawing.  
Good contrasts.  I do think different papers give different results as well.  

The one good thing about this frustrating exercise is that it is helping me to know what I don't know.  Dave wants to talk about what are our drawing "roadblocks" tomorrow.


Finishing up assignments before another class Tuesday


This assignment was "draw a mechanical object".  Practice squinting.  Allow 30 minutes.  I am finding that in using graphite I need to draw by "removing" graphite as well as putting it down.  That's interesting!  

I did use about 30 minutes...maybe a little bit more.
I've always enjoyed drawing mechanical things, incidentally.  
But doing this in graphite is very different for me.

I am spraying the pages in this notebook with a workable fixative to keep them from smearing all over the place.  

We are also trying to practice using "practical dialogue" with ourselves.

That is kind of a nice way to put it.  Instead of negative things like "no that's not right" or "that doesn't look like the angle"...you are to practice saying things like "is that line horizontal or vertical?" or "is the distance from this to that greater or smaller?".  In other words do not use negative self prompting.  I find many of students start their comments to me with "this looks awful" or "the legs are too long" etc etc.  It's a bad path to take.  And can get to be a habit!

I showed someone a drawing a did recently and they went right into the old "I can't even draw a stick man" routine.  That is surely ground into everyone's mind! Of course they could draw better than that if they really wanted to.  But we so often start out negative.

The author of the textbook tries to get us out of that routine right on the first chapter of the book.  

One other thing I "may" have time for today is the study of using the free vs the control grip on the drawing tool.  Because I generally work in a sketchbook...I'm used to working with a more controlled grip.  But the author is suggesting that I try a more relaxed grip in the initial sketches.  Having an easel is nice for more free hand drawing.  

I'll see how time goes.  It's a gorgeous Indian summer day and great to be outside sketching but also great for hanging out laundry and finishing up outdoor chores around the cabin!  


Saturday, September 14, 2019

Drawing Class Homework

The theory that you can put your text book under your pillow at night and sleep on it and get to be a better drawer doesn't seem to work.  So I have to resort to the next idea which is to actually do the homework assignment.


The assignment is just an exercise in following line...in keeping your eyes more on the object you are sketching than on the paper. Looking back and forth.  


The purpose of the onion drawing is first to think about what the vegetable looks like and draw it from memory.  Then go and get the onion (or whatever fruit and veggie you chose) and draw what you see.  We often remember somewhat stereotyped versions of things.
Combating that illusion and drawing from what is right in front of us...drawing what we see (not what we remember) is the point of this lesson.  The pencils used in both these lessons is a Derwent graphic 2B graphite.


The assignment is using something with dark glass, draw shapes and highlights and shadows.  This is challenging for someone like me who is used to putting all those things in with watercolor!  Now I have to look solely at the pencil values.  In some cases in this drawing I had to "remove" graphite to get at the highlights.  This takes more time.  This was done on Stonehenge 100% cotton paper.

There are several more small assignments to do before next Tuesday.  

Wednesday, September 11, 2019

Day One of Drawing Class


Dave is instructing the class about how to position a photographic reference for a study on tone...or value.  


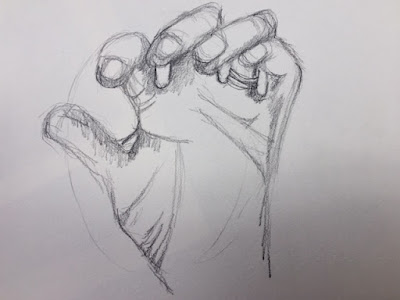
The lesson is about shapes...trying to stop thinking about this as a "hand" and more about a group of "shapes".  Drawing my own left hand.  


After doing a value study of a 2B pencil's range of dark to light...
then we all looked at this photo example and with help from "gridding" of our paper and the photo planned out a copy of the photograph.  Working hard to look and replicate some of the pencil tones.  I switched to a 6B Derwent pencil for the darkest darks.

This was day 1 of a 3-day class.  

We have some suggested homework assignments to read in our text book....Keys to Drawing by Bert Dodson.  And a few exercises that Dave has suggested we try.  Looks like a rainy couple of days up north and so good to be in the studio!  

The book has been around a long time...but has a lot of good information.  Can be purchased used for about $5 plus shipping.


Friday, September 6, 2019

Getting Ready for Inktober


Inktober, you may remember from years past, is the celebration of art involving ink for the 31 days of October.  There is a website devoted to Inktober on which 31 prompts are listed and people worldwide enjoy challenging themselves to interpret the words.  If you go to my past labels on the sidebar and hit Inktober you will come upon some I've done in the past.  Fun BUT challenging to be sure.

Since October has come to be a travel month for Greg and me this precludes a very good handle on doing this day by day.  
Last year I chose instead to do the "Zentangle® Inktober" Challenge along with several folks in the Fine Art Club in Florida.  
There is a published list for that too!  So instead of a drawing you are challenged to tangle something in some way using the tangle suggested for that day.  (although I always substitute a few if they really are not my favorite tangles).  I'm not sure if anyone will take me up on it this time around...but I hope so.

In preparation I decided that this year I would tangle in a hand made accordion folded booklet.  Pages about 5 x 5 I think.  The book has 12 pages in it...and then I used one for the cover below and one for the sample page.  So I have 10 left.  I figure I'll do 3 tangles on each page and then sneak one extra on the last page.  Black Micron pens and white Jellyroll pens are all by Sakura pen company.  


Now just to add to the complication and challenge of the project I am also challenging myself to use a fun little experiment that recently came up in the official Zentangle group.  

It all came about when Maria Thomas (one of the founders of Zentangle) had an accident with her favorite Zentangle notebook.  
Long story short, her ink bottle leaked in an art bag and the pages in her book soaked up the ink on the edges.  OH NO.  But in true Maria fashion she found a way to cleverly use the black and white now on the pages to her advantage.  And low and behold the "ink blot series" was born.  Better known as the "no mistakes" series.  

You can even purchase an ink blotted booklet from Zentangle now to enjoy the same game!  Somehow the idea of purchasing an ink blot that I could perfectly well do myself seemed silly.  So...that is why you see big black blots all over my accordion book below...


The blots are not really ink on my book.  They are made with carbon black Golden Hi-Flow acrylic paint.  

So below I am showing the example of how I plan to do the book.
These tangles are Mooka, Jester and Ginili.  But the new list is below.  

So part of my challenge is to use the "ink blot" in the tangling switching from a black pen to white.  I'll probably do many of these in September but then publish them in October as I travel.  

If you are doing the challenge (either drawing or tangling) you can comment about it at the end of this blog post.