Friday, February 27, 2015

Bubbling Zentangles and Scrappy Collage

Zentangles with Bubbles
3-ring note book cover with Gelli Plate collage

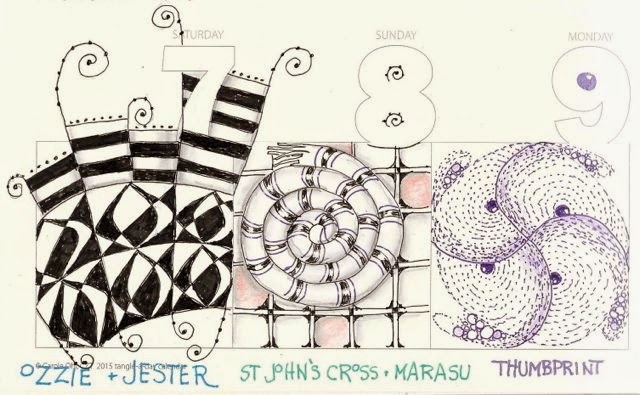
Bubbling Zentangles?  Well, anything is possible!
Someone on Facebook sent me a recipe for "collecting bubbles" on paper.
I had actually done this before but decided to try it with fluid acrylic paint/dishwashing liquid/water and blowing with a straw.
You have to really play to get the ratio right so the color comes up and stay in the bubble long enough so when it pops on the paper you get the image of the bubble.  But, obviously you can do it!  

The lower photo is a collage of scraps of Gelli print paper used to cover an old faded plastic 3-ring binder that I am keeping all my journal prompts in.  I just used a heavy gel medium and really piled it on so that hopefully it will hang together for awhile!  Sure beats that old gray plastic!!!

We are winding down a kind of busy but "okay" week.  Coolish and cloudy many of the days…but we have great hopes for next week. THAT is our week on the beach/gulf!  However…at this point they are saying Wed 78 and Thursday 77.  Looks to me like Thursday is our best day with full sun.  So we are taking beach chairs and a beach umbrella!!!

Got our reservations made finally today…in Sarasota but we'll be visiting friends in Venice, Bradenton and Sarasota. I hope to do some en plain air sketching!  

I am signed up to take a free online class from Strathmore.  It starts next Wed and I'll be "on the road" but we'll be back by next Sunday so hopefully I can still participate. I'll be posting to the blog from my iPad which leaves something to be desired.  But hey.  The Gulf is only about 1-1/2 hours away and we haven't been all season.  It's time!


Thursday, February 26, 2015

Happy Daze

5.5 x8" Title: CZT15: The Hotel Providence

The journal prompt for week 9 was to pick a media that feels your most comfy and pick a subject that makes you happy.   This surely does the trick.  June 2014…Happy Daze!  

Gelli plate messing around.

Gelli plate using styro stamps

Paint drying on Gelli plate preparing for Part II of this technique

Gelli plate printing on music paper using acrylic mat medium resist.

Lots of fun today in the studio…I finally had an afternoon with at least 2 hours solid uninterrupted time.  Suddenly that seems few and far between these days!!!  

Photo 1: Although I much against using styrofoam in any form…when I can recycle something someone else has used I am game to try it.  I imprinted the foam with a ball point pen and cut it out. All of these came from ONE styro dinner plate!  The trick to using these is this…after you have laid down an interesting background on your card or paper.  You use a second contrasting color for the next step (purple).  I place the foam face down on the Gelli plate and then…the real trick to this one…wipe away any paint outside the foam!  Then remove the foam and take a last print.  I also did the envelope.  The Gelli Plate blog has a demo on this.

Photo II: Is part one of a packing tape pull. After imprinting wet paint you can add acrylic stamping to your heart's delight.  Clear packing tape will pull up this paint when completely dry.  Makes lovely college bits or card bits or decorate bits.  The clear spots purposely left can be foils of any color or dusted with powders or you can place on newspaper or phone book pages.  I will show how that looks in another post.  

Photo III: Is a resist done with a stencil.  After the acrylic medium is dry you just paint over it with acrylics and burnish off the paint on the medium!  Like magic the stencil appears.  

Coolish day…light sweater weather.  Sunny mostly but now in the early evening some clouds are rolling in that look a tad threatening.  70s for the next 3 days but the in mid 80s for the weekend.  Oh fun.  Down to the pool I go!

Monday, February 23, 2015

Working on Toned Paper


Besides the lovely honey colored Renaissance tiles from Zentangle.com there are lovely toned papers available from several different sources that make for interesting and subtle changes in the tangles.   Those on 22/23 are actually on a gray toned paper that find quite pleasant to work on.

I have been glueing these into my Tangle a Day calendar to try out some ideas for my upcoming class in March. (see side bar).

Weather warming slightly in central FL…we had 85 on Sunday and I was at the pool.  Amazing!  Wow that felt so wonderful.
Around 80 today but now we are to get some rain mid-week.
No complaints.  I do know how midwest and eastern states AND Tx are suffering in that ice and sleet and snow and COLD. 
I am sure they are all counting the days to spring!  


Thursday, February 19, 2015

Diva's Challenge: Happy Chinese New Year


Diva's Challenge this week is to celebrate the Chinese New Years.
Year of the sheep or goat.  I decided to show off my hand carved "chop" of my name in Chinese surrounded by some new tangles.
Vigne and Sanibelle (thanks to Cynthia who used them this week on her blog Artmarks (see side bar).  And I added Tumbleweed which is Helen William's newest one.  Chops are always in red.


Calendar in Zentangle…heading into Lenten season...


Well,  Fat Tuesday and Ash Wednesday are now behind us and we head into the Lenten weeks before Easter.  

Central FL is staggering under cold temps (for us) and we live for the promise the weatherman has given us for 80 degrees by Sunday!  But what a roller coaster!  Seems worse every year!

And our hearts go out to the cold dwellers of the upper midwest and northeast.  I know our cabin in upper Wisconsin is -29 this morning.  That is beyond our comprehension.  

Monday, February 16, 2015

Journal Prompt #7


Prompt #7 had to do with choosing a bird and relating it to your life or your art.  I picked "Birds of a Feather Flock Together" and related that to all my artsy friends who all do different things and create art that is oh so unique.  And yet…we are all birdies together on the tree of art.  

I also include my own hand-carved "chop".
You can find out how to print your name in Chinese by googling it (of course).  

The background is Gelli print paper.  And the tree is 3-dimentional paint.  The birds are made with a Q-tip and acrylic paint!

Sunday, February 15, 2015

Vermont Post office watercolor (with ink)


Not photographed in the greatest conditions…I need to take it outside in bright shade for a good photo not under artificial lights like above.  But you can sort of get the idea.  I haven't signed it yet.
But I do like the sort of loose ink feeling and yes the Elegant Writer Ink did set permanently after it was wet!  (see previous post).  

When I think it's done, I spray it many times with clear acrylic and frame it without glass.  Several of my latest wc I have sealed with Dorland's wax.  I don't think I will do that for this one on paper but I think I might try a sample small one sometime and see how that works out.  I've never waxed a wc done on paper.  

Anyway this was totally fun.  And if you do watercolor…I recommend it.  


Drawing in Ink with an Elegant Writer pen


The post office at Rupert, VT is such a quaint and fun image that I thought it would be fun to try drawing/painting it in a new way.

Karlyn Holman has a technique she uses with a speedball brand pen called an Elegant Writer.  Designed for calligraphers mainly, she has discovered that is water soluble.  Now that is actually not anything too new…as there are many water soluble pens out there. 
I use Tombows that way all the time.  But what is different about this ink is that once it has been wet and then dried…it becomes permanent.  Like Intense pencils, once you wet them they become permanent as well.  So after you do the initial drawing you wet a wc brush and you let the ink begin to put in the values for you!  

Now THAT is new.  And what if offers the watercolor artist is the chance to draw with ink, shade with ink and then to PAINT over the ink without moving the ink a second time which would blend into and dull the paint.  The key is to, of course, let the ink dry before you paint over it.  

AND there is one more important step…you have to lightly spray the whole inked drawing with "mists" of water.
That way it insures any ink that has not been touched by water previous will now be "set" permanently.  

As far as I can tell Cheap Joe does not carry the "Elegant Writer" pens.  Dick Blick carries them for $1.44 each…Karlyn Holman recommends the "fine" size in black.  You can also go on line and watch Karlyn demo this technique.  Click here.

Now as a disclaimer I haven't painted it in wc yet.   
Tune in tomorrow.

Saturday, February 14, 2015

Exploding Valentine


It's lots of fun folding an "exploding" card.
And if you don't have time for using it for Valentine's it'll work for any occasion, of course.  I used stamps like the gal did in the explanation but you can, of course, do ANYTHING on an exploding card!  I am already figuring out how to do a Gelli plate design and masking the center for the message.  The steps are at:

http://balzerdesigns.typepad.com/balzer_designs/2015/02/valentines-day-explosion-card.html

Friday, February 13, 2015

Keeping our heart warm!

Streaking along in my calendar and I was thinking doing a 3-part all together would speed it up some but actually it didn't.  I just got carried away with all the heart tangles!  And it's always a day for hearts anyway, isn't it?  

My friend owns a candy store in Indiana.  
She sent me some photos of the inside of the store now getting ready for THE big candy day of the year.  OMGosh.  
I thought I had hearts!  Ha.

Keep warm up north you guys.  It'll be -16 at our cabin in the north woods on Saturday!  Kind of a chilly Valentines, I'd say!  

Wednesday, February 11, 2015

Feb 11 is National Share Art Together day! Starting today!

Sheila and Cynthia gamely get messy doing light molding paste stencil work!

Ginny starts carving a CHOP (backwards of course)

This says "Ginny" in Chinese
All chops are printed in red.

Sheila binds a book (adding beads later).

Our play day afternoon at Cynthia's house included a make your own salad, yummy bread, and warm chocolate chip cookies!  (lots of hot coffee and conversation). Then off to the studio to play together.  We are thinking that Feb 11 should be "National Play in the Studio Day".  Preferably with friends!  

Thanks for a fun afternoon Cynthia!  
Ginny Sullivan stopped by for a look-see at what we were doing and a chat.  She showed us photos of her home made dolls…so cute!  Start your own play day!  

Tuesday, February 10, 2015

February tangles


Can't believe I am a day behind on the calendar again!  Sigh.
In the old days I'd be a week ahead!  Hahaha.  
Ozzie is the only new tangle on this 3-day spread…but am enjoying it!

Central FL is getting a cold snap again…we "may" get down to a freeze on Sunday night!  We thought we might have gotten "home free" this winter but silly us!  But when we look at northern WI (our summer home) the temps are VERY bitter…well below zero!
Winters sure seem longer these days, don't you think?  I sure am anxious to FL to start warming up again!!!

Teaching a Zentangle beginner class here in the park a week from today and have 21 signed up!  Whew.  Haven't had THAT big a class since I first started teaching!  Deadline for sign up is Friday and am hoping no one else signs up by then!  


Saturday, February 7, 2015

Valentines


When you have 12 grandchildren…then Valentines is a BIG DEAL!  The older ones are always curious as to WHAT I will think up this year.  

It's a combination this year…Gelli plate print papers used to fold little envelopes, larger hearts cut from Gelli print papers or Washi tape, Zentangle®, and this year all those little hearts are 3-dimensional as I used molding paste through a heart stencil.  On some I colored the molding paste pink first and sometimes I just put it on white and then colored them with iridescent pan pastels (which have to be sprayed later with clear acrylic so they don't wipe off.)  But they are worth the extra step!  

Everything gets mailed off on Monday!  Whew.  Another Valentines Day!   

Thursday, February 5, 2015

Zentangle afternoon


What a nice afternoon at Mary's home in Pennbrook Fairways Park.  Seven lovely Zentangle students.  They did some wonderful pen work!!!  We actually did a second tile that I did not get photographed.  

Thanks Mary for the lovely refreshments!
See you in March at the 101 part 2.


Diva Challenge: Athitzi

What's fascinating about Athitzi is that there is absolutely nothing to it and yet is spectacular.  It's all in the shading, of course.
It's just lines…lots of little lines or long lines as you wish.

It would, you think, take a lot of time but if you keep the size reasonable, not really.  The examples given in the challenge were layered..so like another shape behind this one with more shading.
Fun fun fun.  Nice illusion.  Lots of creative opportunity.


Wednesday, February 4, 2015

Journal Prompt #6


Prompt this week to pick a favorite artist and on his quotes and then make up a tribute to him/her.  This background was created in acrylic and molding paste weeks ago in sunny yellow.  Boy did his sunflowers jump out or what?  I did an "acrylic skin" to get the somewhat transparent head of Van Gogh on there.  
Otherwise it's ink, wc, and acrylic.


Tuesday, February 3, 2015

Zentangle Calendar Feb 3


Had to do a football for Sunday.  WHAT a game!
I actually paid attention!

Thanks to my good friends Peg and Norm for hosting us even though they were staying at a hotel the night before in Orlando and got woken up at 5 am by a faulty fire alarm and had to exit the hotel!!!  OMGosh.  What a long day for them.  Great dinner Peg!

Just got Tuesday done today…just barely staying with the calendar these days!  

Prepped for a Beginner class I am giving on Thursday afternoon…all packed up for that now.  Been busy with some church work and some long meetings.  Think I might have a day off tomorrow!
Maybe get those Valentines done AND my grandson Eric is having a birthday..time to get the card off to him.


Sunday, February 1, 2015

Gelli® Plate Workshop plans


I have been asked to teach a mono-printing plate hands-on workshop this summer up in Wisconsin.

There are tons and tons of home made and around-the-house objects that make marks on Gelli® plates. I did however want to give my students a little "packet" of things that we could explore with and when I saw a similar idea on Pinterest I thought this might be a simple and no-expense way!

What you see above are from an old deck of cards.
You can see that I have used a scissors or a utility knife to cut shapes into the cards to use as stencils, masks, and mark makers on a Gelli plate.  The one on the top right has holes punched in with a hole punch AND each side of card is cut with speciality scissors…one is pinking shears and the other is curves.  All make GREAT marks on the plates.  

Sometimes both the negative and positive shapes cut out of the cards can be used.  And they are plastic coated and last a long time!  The plastic knife is a substitute palette knife which not only makes marks itself, but can be used to mix paint colors or to left stencils off the plates.  

I'll do a few samples using just these and post them later.

Also I want to have a sample bag of items using Gelli print papers.
Example: as gift wrap, as a greeting cards, as part of a collage, as covering for a journal cover, decorating stationary and envelopes, 
etc.  Anyone who has any more ideas of ways to use the papers let me know.  I think for a workshop this will be very useful.  If you teach Gelli workshops I'd love to be in touch with you!